Introduction
Hello everybody,
I see a lot of new players being very frustrated by playing vs a lot of rush decks in their early experience of the game, first and foremost, yellow rush (in short: “YRush”). While I understand this frustration, the problem is not entirely rush decks being too strong - a point one can argue about, but I don’t want to discuss here.
The actual problem new players have, when facing rushdecks in general (and YRush in particular), is a rather huge burden of knowledge about how to deal with these types of decks. The YRush approach might even be the most trickiest of them all, due to the mix of high mobility, movement tricks and removal, the commonly used YRush lists bring to the table.
When losing to YRush, new players often blame their decks, missing cards or just YRush “being too strong/OP”. However, more often than not, they either don’t even notice their actual mistakes which may have led to them losing the game, or at least they don’t know how to improve. Of course, there are “good” and “bad” matchups.
Most of the time, however, the main factor losing the game is simply poor land placement - which especially yellow and blue decks are really good at punishing, if the opponent knows what he’s doing. Yellow rush is no exception. Rush decks in particular often accelerate the problem by their oppressive nature. While slower decks give new players some time to think about their playstyle and figure out mistakes, rush decks apply constant pressure, creating feelings of helplessness and frustration. Land placement mistakes are (naturally) invisible to inexperienced players. And even if they notice such mistakes, what would’ve been the correct play usually remains hidden, if there’s no one to tell them.
The goal of this guide is to lift this burden of knowledge by teaching you a basic understanding of how yellow rush works and how to stop it, especially in regards of the correct land placement. While most of this isn’t obvious, I think it’s quite logical once you understand how yellow rush works.
Just to avoid misunderstanding right away: You don’t have to apply each and everything described below to win a match vs YRush. After all, (believe me or not) YRush isn’t the easiest deck to play, either. Anyways, the more things you can learn from the stuff below (and adjust your playstyle accordingly), the higher your overall win chances will be.
I’ll explain most of this with sweet little pictures to ease the understanding of what I think is quite a detailed and complex explanation. This will hopefully distract you a bit from the sheer amount of text I’m throwing at you. I’m sorry, I can’t offer a shortcut here, but that’s the way it is with complex information.
So, let’s get started.
I. Know your opponent: What is yellow rush?
1. Goals & gameplay of YRush
YRush aims to put as much pressure as possible on the opponent from turn 1 onwards and finish him off as quickly as possible. To achieve that, it basically uses many cheap/haste creatures that scratch the opponents orb with many small hits. In case the sum of the small hits aren’t enough, YRush tries to overwhelm his opponent with a very big and mobile Zealous Crusader, a creature that grows for each hit on the opponents orb.
YRush also uses some kind of removal to deal with small creatures which block its way (Soul Drain, Choking Sand) and/or to deal with big single targets, such as Verduran Force or Ogre Battler (Last Nightmare). Last but not least, some lists usually have access to one of two movement tricks (Flash Wind, Oradrim Fanatic) to give creatures another full movement.
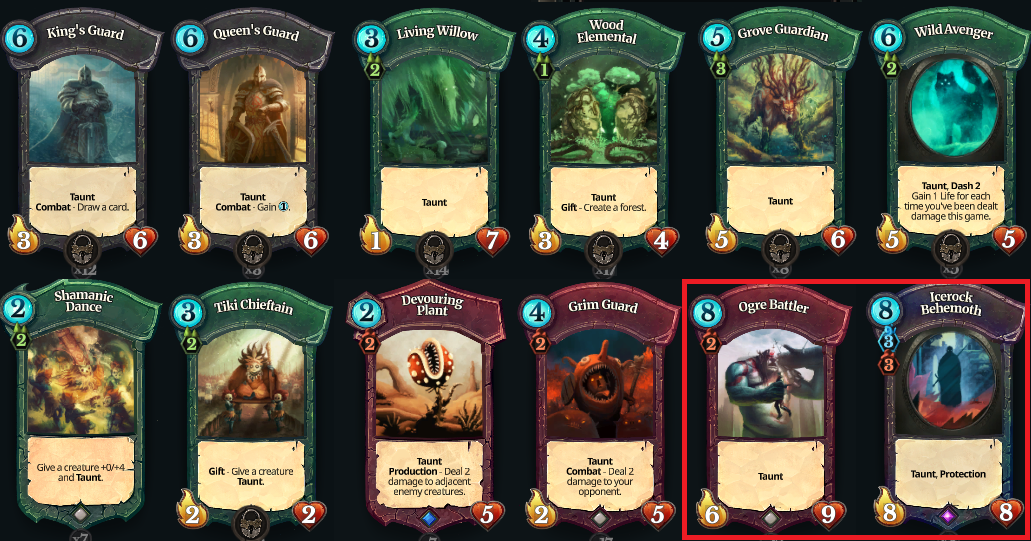
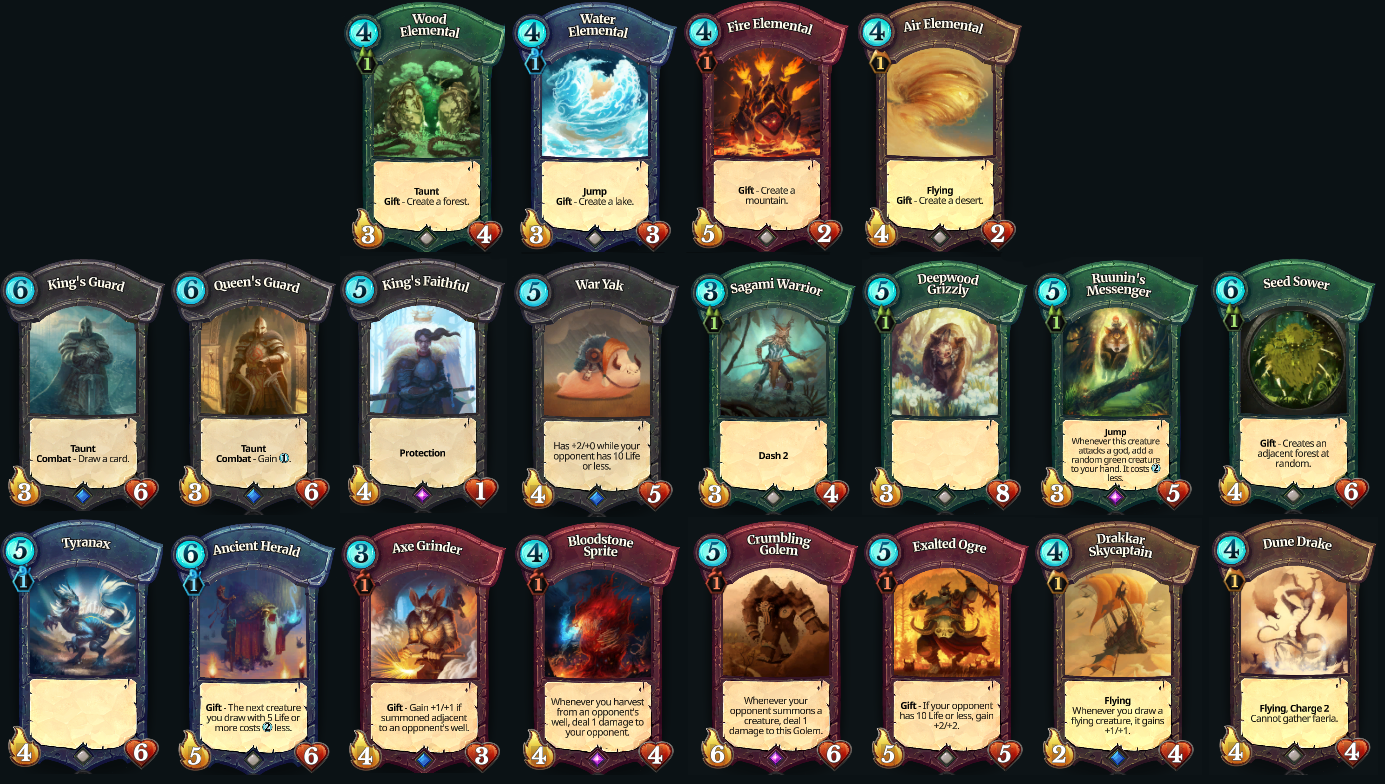
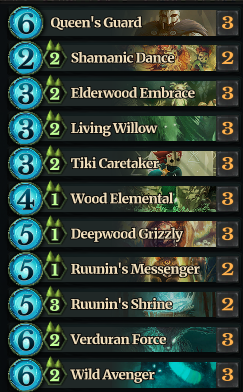
Here’s what a typical yellow rush list could look like:

2. What stands out? What are the weaknesses?
- Many haste creatures (Khalims Follow, Oradrim Monk, Wind Soldier - all of them with only 1 health)
- Zealous Crusader (synergizes with many small orb hits) - 5f, 2D, 2/2 - charge 2, gain +2/+2 for each hit on the enemy orb (while in deck/hand)
- Khalim (best opening) - 5f, 2D, 3/6 - flying, charge 2; adds 0-cost Khalim’s Follower to the hand, for each time this hits the orb
- Dune Drake (2nd best opening) - 4f, 1D, 4/4 - flying, charge 2 - can’t collect faeria
- Removal: Soul Drain (2 damage)/ Last Nightmare (hard removal)
- Possible inclusion: Movement Tricks (Flash Wind/Oradrim Fanatic)
As you can see, YRush evolves around the synergy between haste creatures to hit your orb as soon and as often as possible, possibly destroying your orb by all the small hits or a big zealous crusader later on.
When you look at the (especially haste) creature’s bodies, you’ll notice that most of YRush’s creatures are rather easy to deal with - or would be, if you’d face them in a normal combat situation. Therefore, YRush usually tries to ignore whatever you throw in its way as much as possible. Haste creatures achieve this by attacking (and possibly collecting faeria) within the same turn they are summoned. If the opponent can deal with them after the first hit, their job is already done.
a) However, in order to do this, the YRush player first has to meet a critical condition: Having one or more free desert tiles within 2 spaces of the enemy orb.
I can’t stress this enough. YRush will have a very hard time finishing you, if they can’t reach your orb constantly. Especially if their crusaders remain as a 2/2 - 6/6 body, because of the rush player not being able to hit the orb more than 2 times early on.
There are basically 4 options to stop (most) haste creatures right away:
- Claiming all tiles within 2 spaces of your orb (hard to achieve; more on that below)
- Placing one or more taunt creatures next to your orb and/or the opponent’s desert tiles, possibly with high life and low attack, as all the haste creatures only have 1 life anyways. (counter: Flash Wind, removal events, especially Last Nightmare/Choking Sand)
- Blocking the deserts with your own creatures (counter: dito)
- Blocking the way from the deserts to your orb with a body (doesn’t work if the desert is next to your orb, obviously)
Of course, there’s also stuff like the 4/4 Dune Drake, 3/6 Khalim, 5/4 Shaytan Demon (and 3/3 Oradrim Templar) to consider. These creature’s are harder to deal with and won’t die to a mere Living Willow, for example. However, they are stopped by a taunt or blocking body just the same, at least until the taunt dies.
b) Yellow Rush usually doesn’t set up harvesters. → Few available faeria
Since YRush has a hard time to pierce through an established defense, it needs to destroy the orb before its opponent can achieve such a defense (or at least get him into lethal range for a wind soldier/flash wind movement combo). Therefore, YRush doesn’t set harvesters, so it usually has only 3 faeria/turn at disposal. If its opponent is able to set up harvesters by himself, he’ll eventually be able to starve yellow rush by playing bigger creatures and getting better trades.
However, to prevent running out of steam, YRush has some tools to gain additional faeria:
- Summoning haste creatures on deserts next to a faeria well - they will collect in the same turn.
- Khalim’s Prayer - a 0f, 2D event that adds +2 faeria and draws a card; condition: Opponent’s orb was hit on the same turn + no other prayer played within the same turn.
- Summon other creatures next to a faeria well (Shaytan Demon, Crusader, Khalim; note that Dune Drake can’t collect!) - they will collect on the next turn, if left unchecked.
- Khalim - If the way to the opponent’s orb is blocked, Khalim is also a capable harvester, because he can collect from two wells within the same turn while staying close to the opponent’s orb and possibly reach it easily, if necessary with a movement trick (Flash Wind/Oradrim Fanatic)
Because of the first 3 options to gain additional faeria, the most dangerous spot for a YRush’s desert are the far left and right spots between your orb and your faeria wells on the bottom line. Not losing these spots to the rush player can be essential! (More on that below, in section IV. Land placement)
c) Land requirement of yellow creatures is usually 2 deserts
This rule applies to every commonly played creature in yellow rush, except Dune Drake, Air Elemental and Oradrim Templar. Also, only Dune Drake and Khalim have flying AND charge 2. Consequently, those are the creatures, your opponent will mulligan for. Playing an Air Elemental on the center of the board is possible, but it’s rather far away from your orb and also easy to deal with (4/2 for 4f cost). Most experienced players usually don’t play Air Elemental in YRush though, because 4f reduces the early pressure quite a bit.
Therefore, your opponent usually won’t play a creature (besides a Dune Drake) before turn 3, since he needs 2 deserts and he needs them close to your orb. (more on that later)
II. Good cards vs yellow rush & cards that seem good but actually won’t work.
I’ve seen quite some new players making the mistake of assuming that healing effects would counter YRush. This assumption is usually wrong.
Healing usually does NOT counter yellow rush
Why? Because, if YRush can hit your orb many times, a +5 healing won’t stop a 12/12 Zealous Crusader from finishing you. And healing effects usually don’t come along with a creature or a body at all. Exceptions are: Tiki Healer (which has a horrible body at 2/5 for it’s 5 cost) and Shimmering Statue (which, in it’s current state, is just a bad card). All other healing options (Healing Song, Gaea’s Grace, Ruunin’s Command, Soul Drain) are Events, which means they cost faeria without providing your board a body for protection in return. However, that doesn’t mean these cards are a bad idea. At least Ruunin’s Command and Soul Drain can work quite well, but they’re usually the icing on the cake. And they certainly won’t help you at all, if you make mistakes in other aspects.
From what I’ve said above, taunt creatures can really save the day. When looking at the decklist above, you’ll notice that only Dune Drake (4/4) and Shaytan Demon (5/4) have more than 3 attack. Hence, any taunt creature with more than 3 health helps and each taunt creature with more than 5 health is great! However, keep in mind that Yrush also has access to a 2 damage event (Soul Drain) and a hard removal (Last Nightmare). Downside of the latter is, of course, that it needs 3 deserts and a whopping 6 faeria. So even if your Living Willow or Wood Elemental was killed by a Last Nightmare, you come out quite ahead faeria wise. Even more so, if you made a trade with it already.
Note: All of the above creatures work, but I’d be careful with
- Ogre Battler - VERY vulnerable to Last Nightmare (LN)
- Icerock Behemoth - Even more vulnerable to LN / Very slow
- Tiki Chieftain - Only works well with another target creature. It can give itself taunt, but a 2/2 body doesn’t help much.
Also note that Queen’s Guard is usually better than King’s Guard vs rush, if you don’t play a very cheap or combo deck. Faeria advantage is usually better than card advantage, because you usually can’t play all of your cards at once anyways. So it’s generally better to have 3 options you can play 2 from, than having 6 options you only can play one each/every second turn. This is even more important vs rush decks, because you’re tight on faeria as the defender early on.
Taunt enabler (Shamanic Dance, Tiki Chieftain) work best on bodies that already have much life and possibly 4+ attack, to deal with Dune Drakes and Demons.
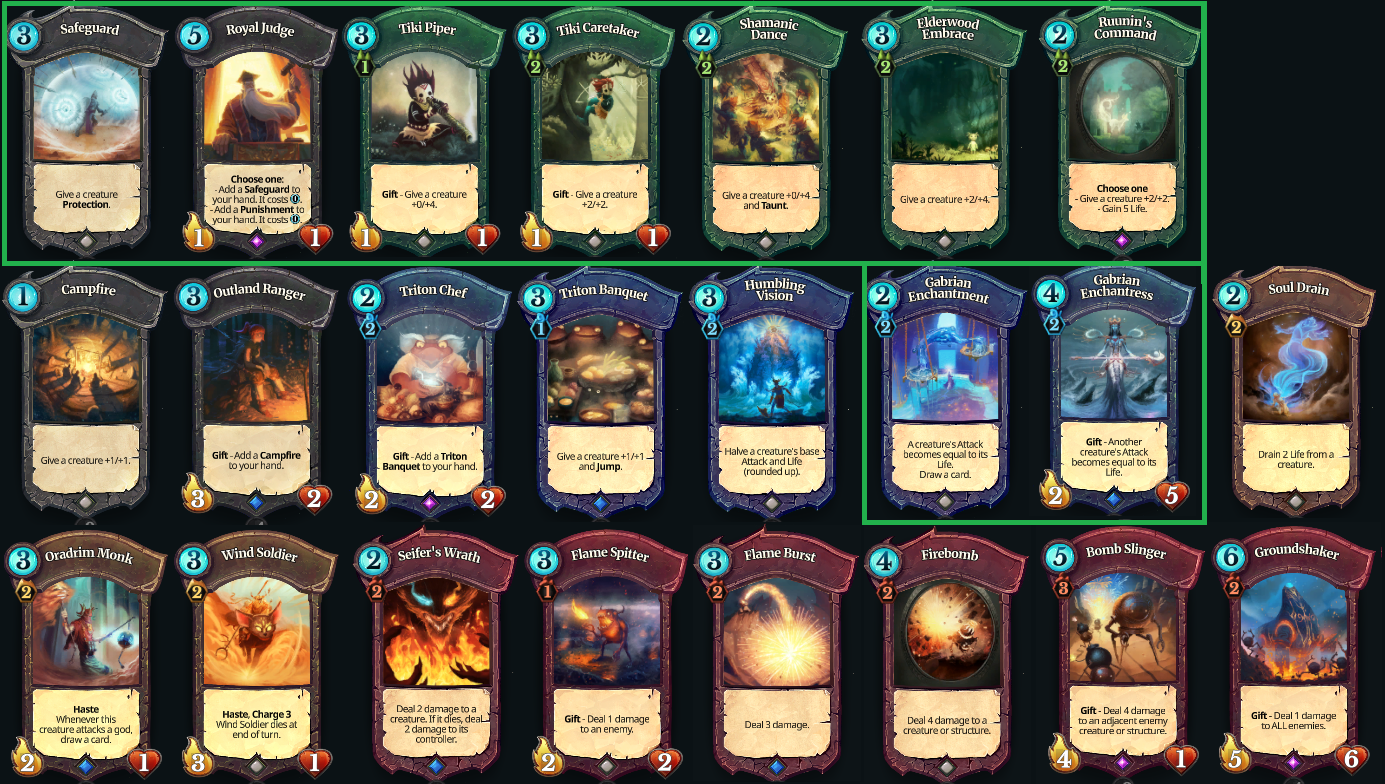
By now, it should be quite clear that claiming important land spots within a small amount of time can be quite important as well. Therefore, cards that allow to play additional lands (and possibly provide you with a body to trade with) come in handy:
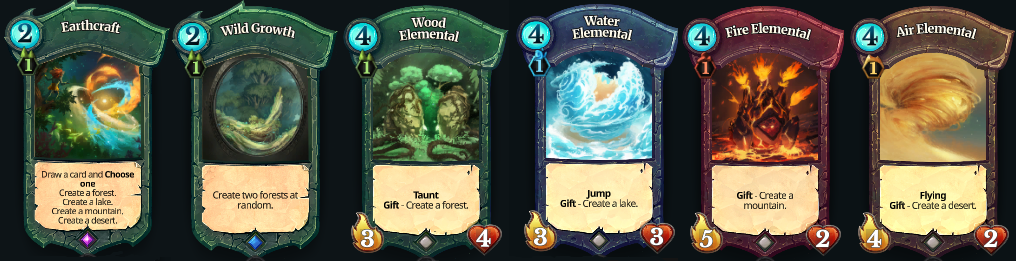
Finally, cards that enable your creatures to make favourable trades (the ones within the green box usually are your best options):
III. Good matchups; example videos
In this section, I want to present some example decks which are favoured playing vs YRush:
- Red Midrange, Red burn.
- Green/Yellow Sacrifice
- Mono Green, both rush and control
- Here’s a (cheap, yet efficient mono green list to learn the basics)[https://boards.faeria.com/uploads/default/original/1X/0bfe21e7930228f21f1e515eccca1ed784d171ec.png].
Of course they don’t win each and every game vs YRush, just as YRush doesn’t win each and every game vs decks it actually is favoured against, for example:
- Yellow Archers
- Supertoad
- Three Wishes
I also want to share some videos of competitive tournament games featuring YRush vs other decks. They should give you some basic ideas of what different approaches vs YRush can look like:
(I’ll add more links to this section later on. Feel free to share video links of games worth watching.)
-
YRush vs Blue midrange - Foxclear v AlphaW on monthly cup qulaifiers
You can learn quite a lot from this (spoiler):
-
It was a very close game, despite Fox playing an unfavoured matchup.
-
Note the 2 mistakes that lost the game: First, Fox didn’t push his advantage with Baeru (sending him to collect). Second, he could’ve killed the 10/10 Crusader, but decided body blocking him should suffice - which it didn’t. If you can remove a big threat immediately, it’s usually better to do it than to just block it.
-
Despite everything, I think it’s a really exciting match, both to watch and to play. So don’t lose your hope too early and try to learn as much as possible, especially when losing a game! And despite the mistakes, both players did a really great job there.
- YRush being stopped by mono green - Salugi v Donkey74 (MC6Qual1 match 2)
- YRush running into a green wall of taunts - Foxclear v AlphaW Match 2
IV. Landplacement
First of all, you have to understand that landplacement is key. It is key for having success in faeria in general, and for winning vs YRush in particular. Since it’s impossible to cover every possible different land placement early on, though, I’ll concentrate on the most basic and common stuff.
I divide this section into 3 parts, the third of which I divide into another 4 parts:
- General understanding of land placement
- The typical openings for yellow rush & the possible approaches to defend.
- The first few turns vs yellow rush
a) Going first (in general)
b) Going second (in general)
c) Vs. The Dune Drake Opening (going second)
d) Vs. The Khalim Opening (going first)
IV.1. General understanding of land placement
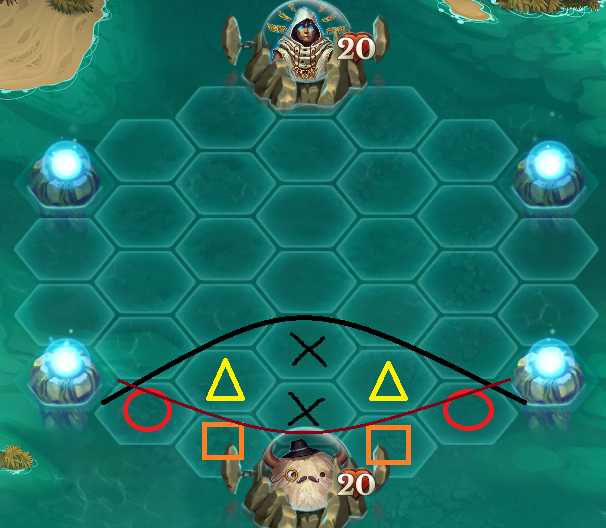
(If you’ve read J0k3se’s Guide this picture should appear familiar to you.)
The understanding of this is crucial in order to deal with yellow rush and will also help you to deal with any kind of rush deck.
So, about the picture above:
-
Every spot below the black line is within two tiles of your orb (assault zone). Hence, your opponent can attack your orb from all of these spots with a haste creature, if he has a desert there. Every spot above this line is rather save, meaning that your opponent needs additional movement tricks (Flash Wind, Oradrim Fanatic, Wind Soldier (straight line only!)) to reach your orb by surprise.
-
Every spot below the red line (also refered to as “bottom line”) has a very high priority for your opponent to place a desert upon, while
-
the red circled tiles are the most dangerous spots for haste creatures, because he can summon, collect AND attack from there within the same turn. On the flipside, if you claim these spots with a (colored) land, you can summon your own creatures there, collect at the start of your next turn AND can attack any creature on the circled, square and triangle spots of the same side, and even on the X-marked spots. Therefore, the red circled spots are the most important spots to claim in a game vs rush, both for you and your opponent.
-
the orange squares are just next to your orb. A creature summoned on this spot can fight any creature on any orange square, black X, yellow triangle and on the red circled spot of the same side, while being relatively safe from creature’s attacks from the opposite side’s red circle. It can also collect from there, by stepping on the red circle.
-
The yellow triangles are the so called “assault spots”, because they’re most flexible for attacking: You can reach the orb on two tiles, by stepping on the black X or by stepping onto an orange square. It is impossible to body block your opponent’s way with only one non-taunt creature from there. If both spots next to the orb are blocked, a creature can also step on the red circle in order to collect faeria.
-
The black X’s are the easiest spots to defend, because you can access them from both sides, even if your creature started on the red circles due to collecting faeria. On the flipside, it’s impossible to collect faeria from there without additional movement. Hence, these spots are the least dangerous to “sacrifice” to your opponent.
Since all of these spots are at least 3 tiles away (middle line) from your opponent, you have at least 2 turns of land placement, before your opponent can claim them. Of course, it’s impossible to claim all these spots within just two turns. BUT, you can gain some additional turns of land placements by blocking your opponents land placement way by claiming the yellow triangles and the black X in the middle. Pay attention, though: Your opponent may STEP on one of your lands with his creatures (especially flyers) and place a desert BEHIND your blocking land tiles, if you can’t block the spots with a creature on your own… (More on that later)
IV.2 Typical YRush openings & general approaches to play vs rush.
Yellow rush usually opens in one of the following ways:
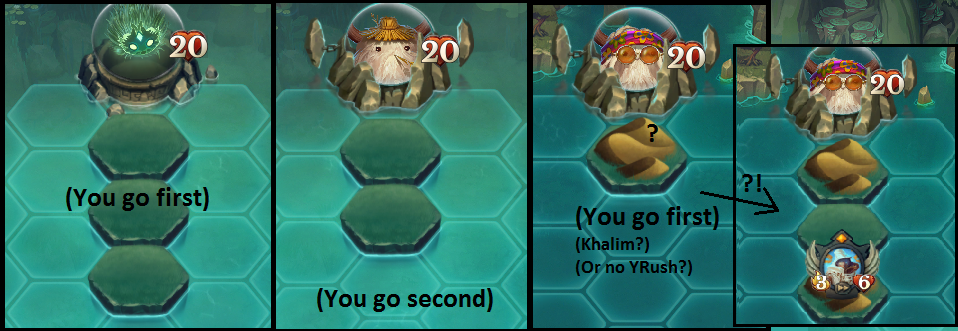
Once you see a double or triple praerie opening, you know that you probably play vs some kind of rush.
The desert opening doesn’t necessarily mean it’s YRush - it could as well be any other yellow deck (archers, control), 3-Wishes or G/Y Sacrifice. If it is YRush, though, it means your opponent is either inexperienced or he has Khalim, Sky Prodigy on his starting hand, if you’re going second, expect some kind of movement trick (Flash Wind, Fanatic) as well.
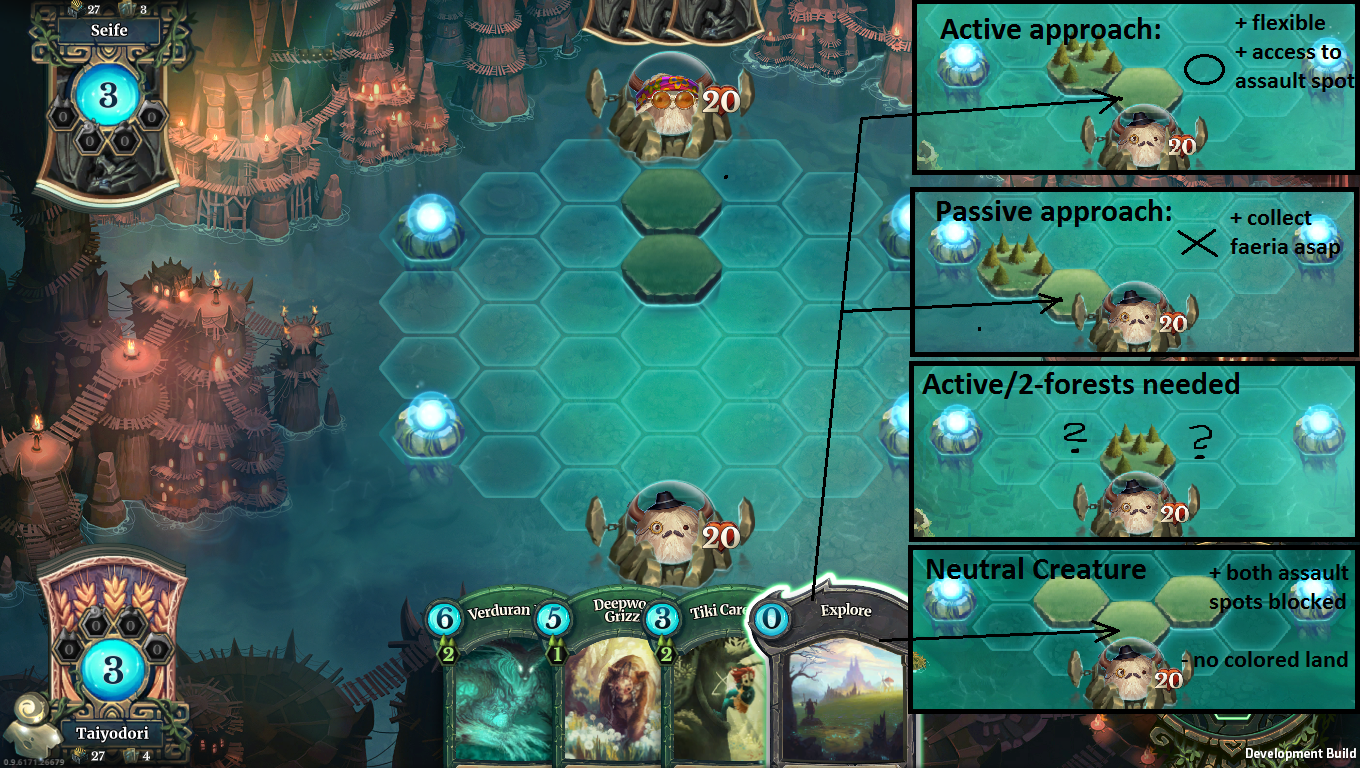
Now there are basically three general approaches on how to deal with rush decks, the choice, of course, depening on your deck and favoured playstyle:
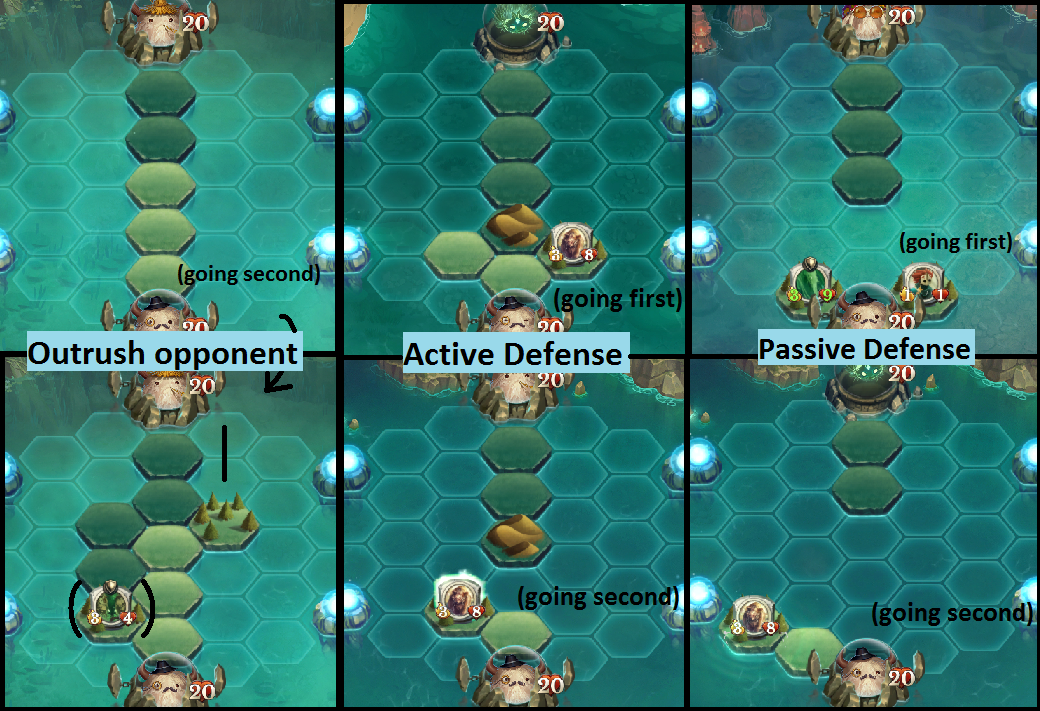
- Outrush your opponent - only do this if you play a fast deck or a deck that can’t defend what so ever. - Or if your starting hand allows a faster finish than what YRush usually does.
- Active defense - my default way to go with most decks, because it’s the most flexible way.
- Passive defense - usually the approach if you play very slow (multi-colored) or burn decks. You might also want to take this approach, if you don’t have any creature you can play on turn 2 due to too high land requirements.
Both defense-approaches’ goal is to stabilize a defense around their orb first. As soon as the rush player continues to struggle piercing through the established defense, they aim for a quick counter attack to turn the tables.
I’ll mostly concentrate on the 2nd approach (active defense), because (for new players) it’s the most complicated way, yet the one I had the most success with. It also should give you a basic idea of how the 3rd approach (passive defense) works. (Again: The other two ways can be more efficient sometimes, depending on your deck, starting hand and personal comfortable playstyle!)
Below, I’ll explain the first few turns very detailed, because everything that follows basically builds upon them and varies from game to game, due to the many different shapes the board can take.
IV.3 The first few turns vs YRush.
a) Going First
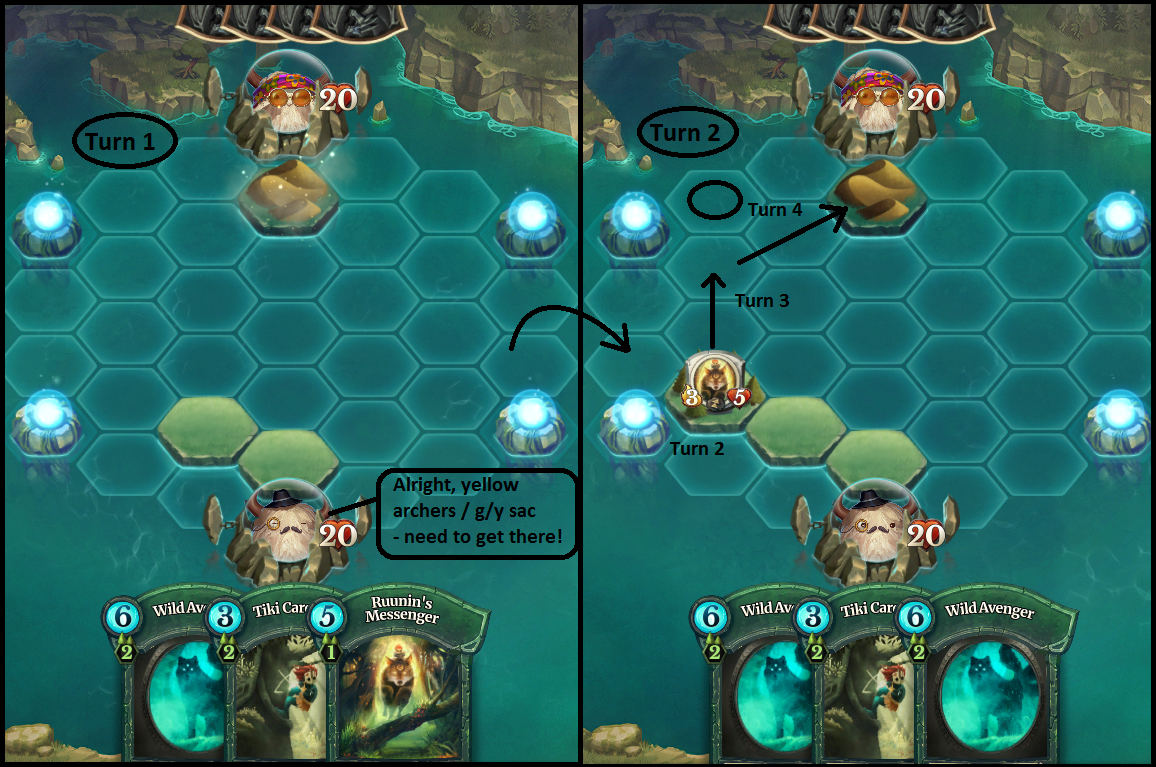
When going first, we don’t know whether we play vs YRush or vs something else, yet. With a non-rush deck, we usually want to gain access to one of our faeria wells. So we either want to place a colored land next to your orb (passive defensive) or a 2x praerie in front + to the side (active defense). If I don’t have access to special early plays (think: Prophet of Tides, Triton Diver etc. → lake in front of orb) or play some special deck (e.g. Yellow Archers → desert in front of orb), I usually go for the active defense, because of two reasons:
- First, I can place a colored land the turn after on more active spot, just next to the middle line (usually next to my faeria well) so I can summon creatures that are closer to any incoming fights later on and start contesting one of the faeria wells on the side.
- Second, in case my opponent plays rush, I’ve claimed two dangerous spots within the assault zone already. I also can attempt to land block my opponent on the subsequent turns from gaining access to the bottom line.
If you don’t have any creature to play on turn 2 due to land requirements, don’t go for the active defense!
If YRush can open with 2x (or 3x) paerie → desert → Dune Drake (or desert → explore → desert → Khalim), it’s essential to have a body to block their way to the orb. Reason behind this are the land placement mechanics: You can only place a land from one of your creatures onwards, while it stands on a land tile (own or opponent’s). So when starting with 2x praerie (or any colored land in front of your orb), you better make sure that your opponent can’t just fly over to that spot and build a deep desert on one of the spots next to your orb!
Therefore, creatures that only have one colored land requirement (or are neutral) with a faeria-cost of 6 or less, while having more than 2 life (Soul Drain!), are good inclusions, if you plan on the possibility of active defense approaches:
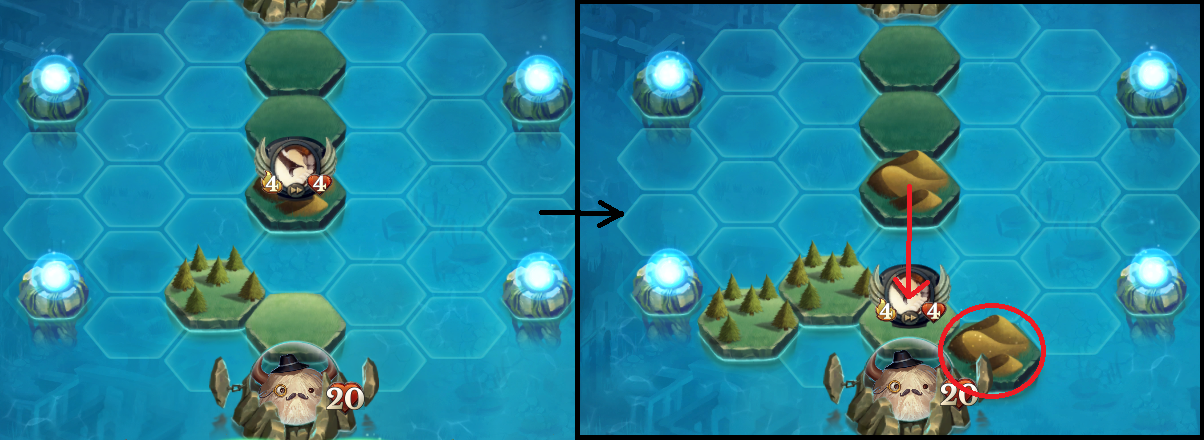
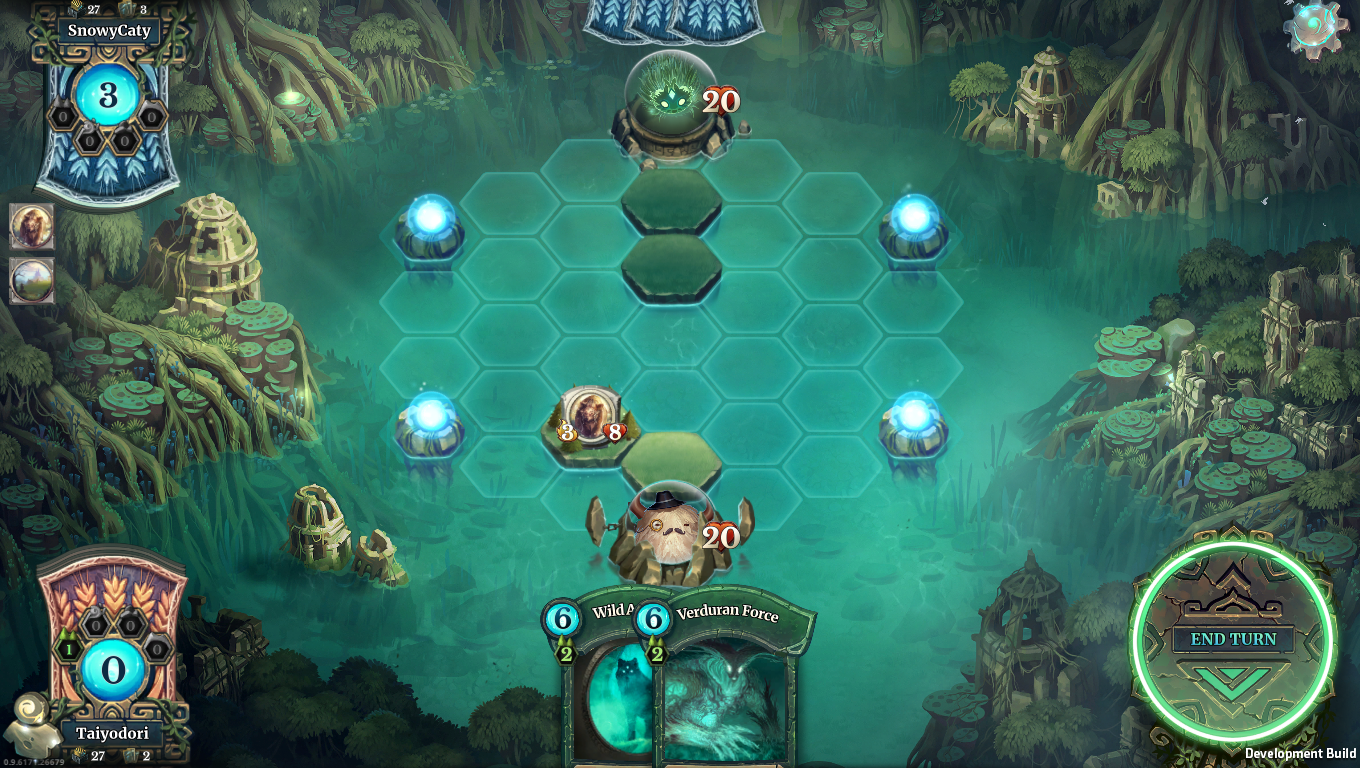
So, an optimal start can look something like this (even better with an Elemental; in which case immediately claim the circled spot of Turn 3 with the additional colored land):
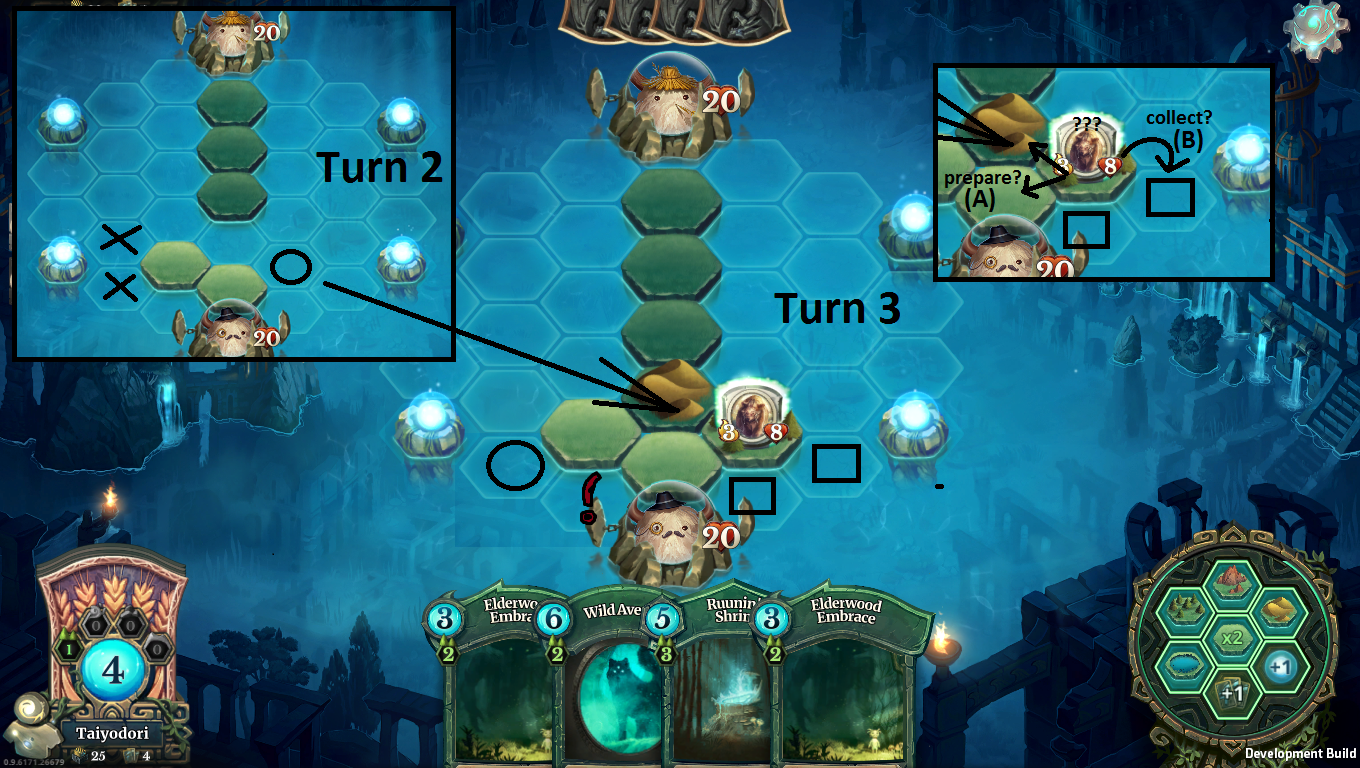
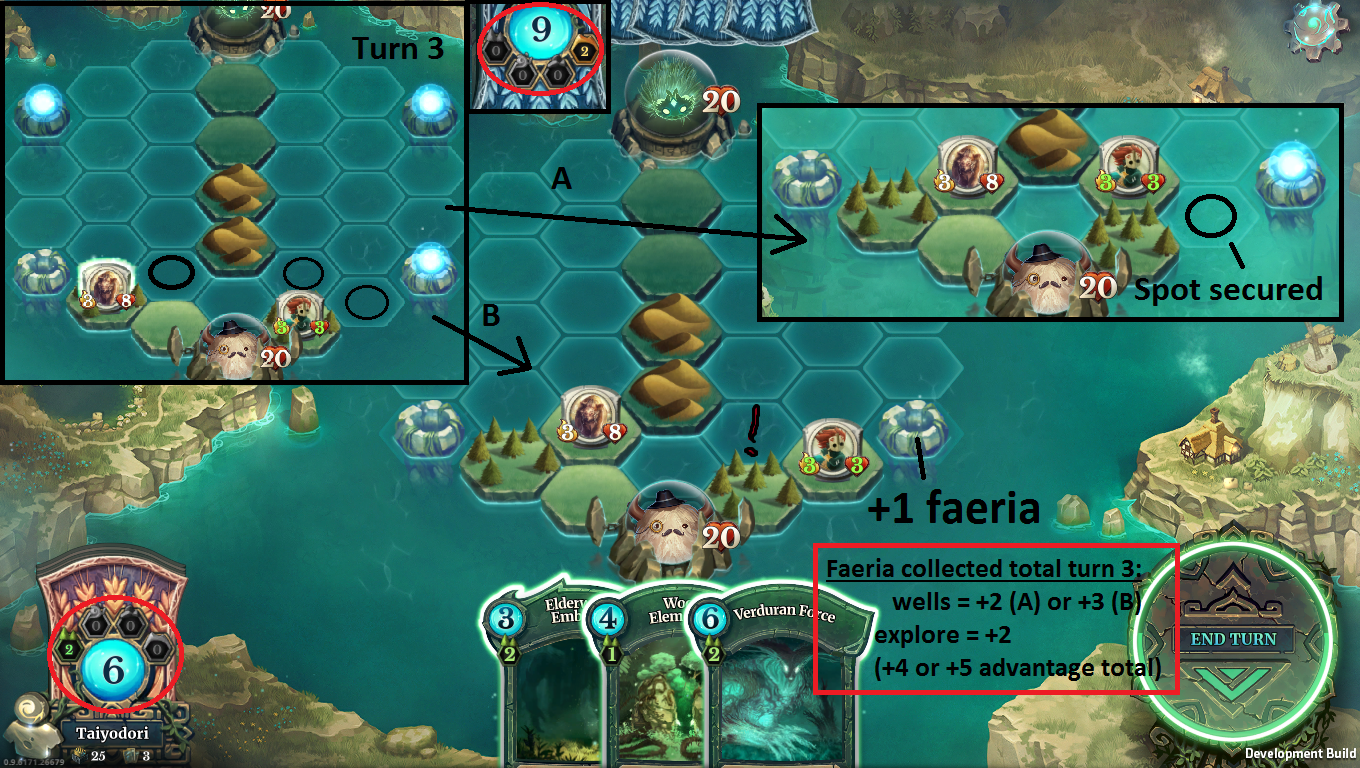
Placementwise, my opponent might’ve just made a small mistake by placing his first desert two tiles in front of my orb instead of one tile to the left, because now I can step on his desert to prevent creature summonings from there. Anyways, let’s analyze the situation:
Note that I have a colored land on the right side (assault spot), from where I can reach any possible combat situation close to my orb except from that circled spot on the left faeria well. Because of this, I want to place another colored land on exactly that spot (remember: one of the most dangerous spots my opponent could take!). If possible, summon a creature there now as well, so
- I can start collecting from one well on the next turn. Even if it’s a Tiki (in which case, make it a 3/3 (caretaker) or 1/5 (piper); a creature with protection would help as well (King’s Faithful, Queen’s Favourite) remember: Soul Drain!). Starting to collect asap is crucial! Your opponent has the more faeria-efficient early game cards. We need the extra faeria!
- and also cover the last spot I couldn’t fight an incoming creature from.
Note that the “!”-marked spot is an opening, though. If my opponent has an Air Elemental, he could claim that spot by playing another desert → khalims follower → step on my land → Air Elemental → desert next to my orb. However, even if he does, with a newly summoned creature (on the circled spot), if I step on the desert now, I could still reach it (see below Option A).
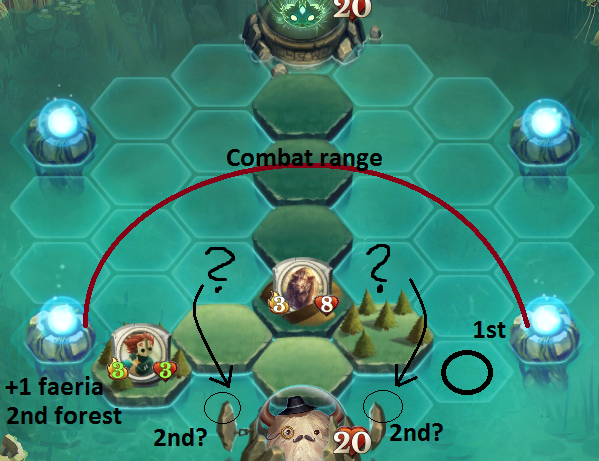
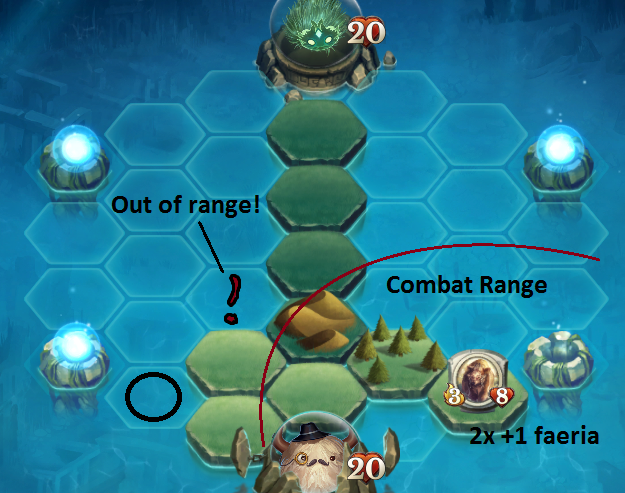
However, I could also place another praerie to the right and start collecting with my grizzly. In that case, I fortfeit some combat range though (see below, Option B)
In case I can summon an Elemental on the new colored land on the circled spot, though, I can take the same spot on the right side as well, with the additional colored land. That way, I can summon creatures next to both faeria wells and attack subsequently, which is a HUGE advantage. From there on, it’s just another 2x praerie to cover all leftover spots within the assault zone. Furthermore, I could start collecting with my grizzly as well, though in that case, I leave my orb open for a Khalim’s Follow/Oradrim Monk.
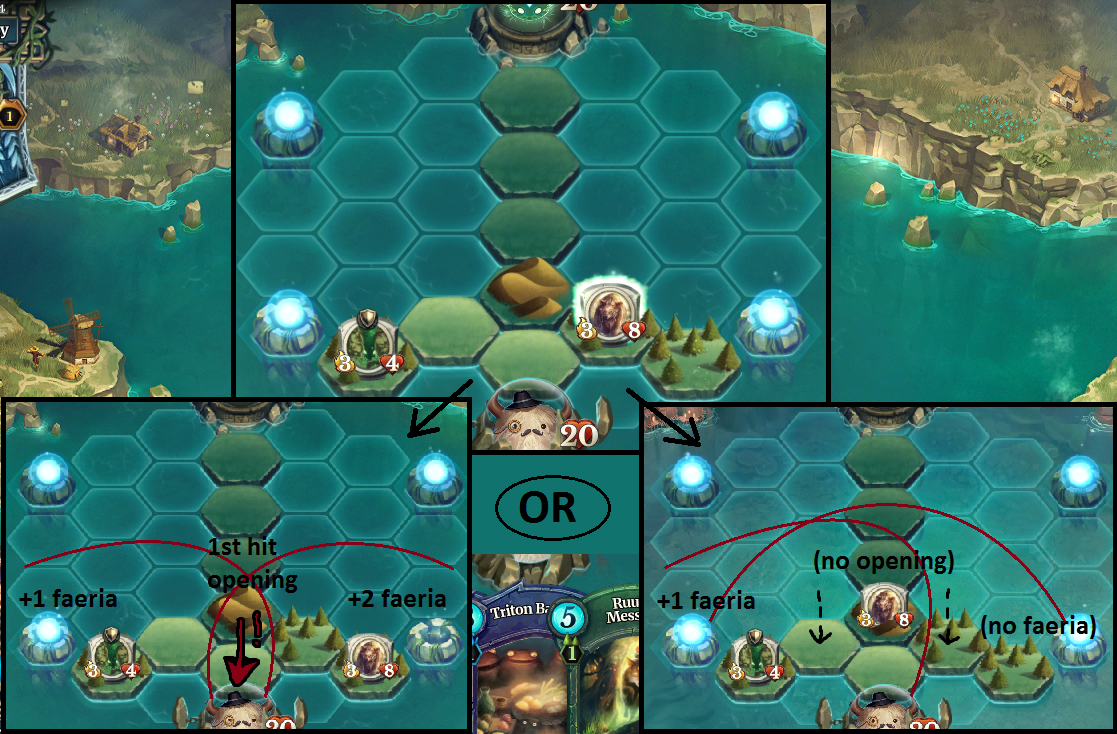
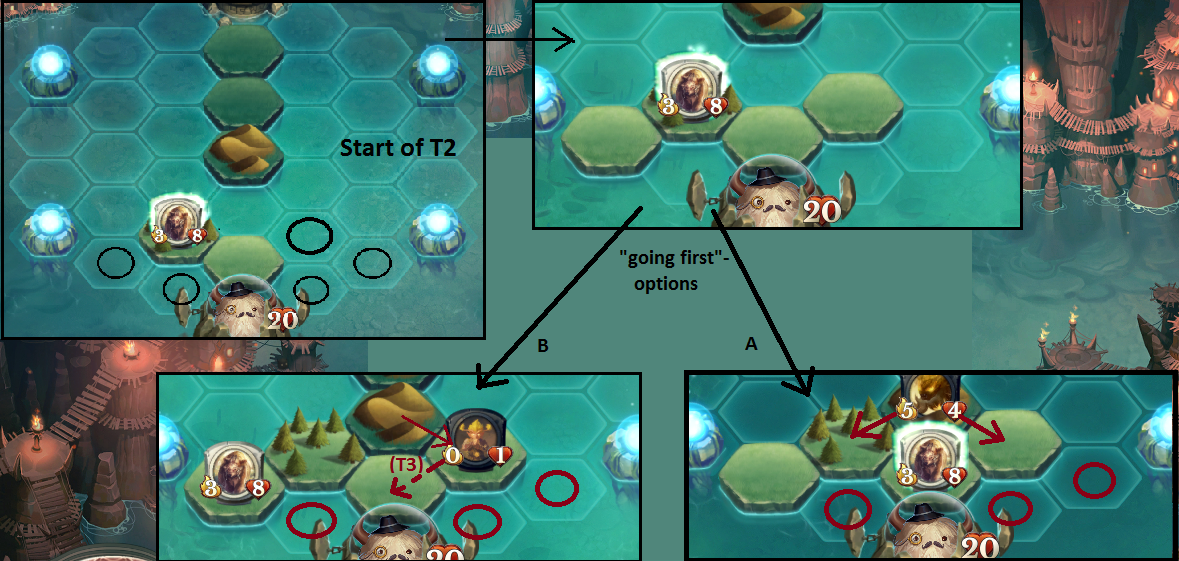
Anyways, I actually have two options here:
A)
As I suggested above, I built another colored land and (possibly) set up a harvester there. Now I can collect every turn and also combat with any incoming creature. My grizzly also blocks the direct way to the orb for any incoming creature without movement tricks.
As you can see, I can reach any possible target with my grizzly next turn. I also gain +1 faeria with my Tiki next turn and got a second forest already. By stepping onto his desert, I also prevented my opponent from summong a second creature (or a third, in case he can step off a newly summoned desert via dash/haste), so I can rather easily deal with any incoming creature, using both, tiki and grizzly. This is especially useful, if I have a (surprising) buff to combat as well. (Safeguard, Elderwood Embrace, Campfire, Triton Banquet, Ruunin’s Command, another Tiki)
Note that I’d even play any 1/1 body on my new land there, even at the risk of a Soul Drain. With many 1/1 or 2/2 bodies, I still come out ahead either faeria-, carddraw- or statwise (think: Elderwood Hermit (-> buffed up grizzly), Bloomsprite (-> reduced new card), Spring Mochi (-> reduced card in the future), Farmboy (+1 faeria advantage), Deathwish Ghoul (dito), Cartographer (faeria advantage AND land advantage), village elder (card draw))
Here, I collected +1 faeria immediately instead, and will collect another faeria on the start of my next turn. I also claimed another 2 (!) spots within the assault zone. Note that, instead of the spot next to my orb, I could’ve claimed the circled spot with my second praerie. This would be safer, because if my opponent has a haste creature + Air Elemental, he can now claim the circled spot himself, which would be worse than the spot next to my orb. However, I have to replace my praerie with a colored land later on, if I want the circled spot for my own summons - which would be inefficient, if done immediately on the next turn, because it leaves more ocean spots for my opponent to claim.
On the downside, I only have one colored land and no second creature to act with just yet. Since my opponent didn’t play anything yet, he has 11 faeria at his disposal, possibly summoning two desert creatures, maybe even 3 (of one of them has haste/dash to step off his desert), applied huge pressure on me! If I now claim the circled spot with another forest and set up a creature, I’ll take at least one, probably two hits to my orb on the next turn.
So, in general, I recommend option A instead, because it leaves you more flexible positionwise. Option B might be favourable, though, if you couldn’t summon another creature without the additional faeria. When taking option B, if possible (= 1 land-req), summon another creature on your first colored land before you end your turn, to maintain a wider attack range.*
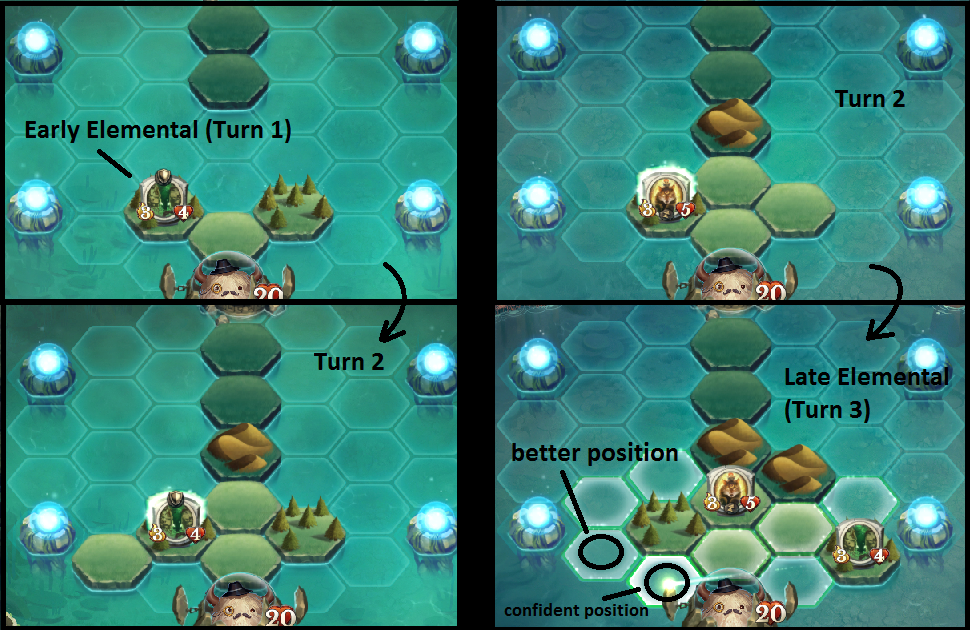
However, I can get the best of both worlds, if I have an elemental (and my first creature didn’t cost more than 5 faeria):
However, if you don’t have any creature to play on turn 2 with a colored land requirement of 1 or less, I recommend starting with just a colored land to one side of your orb instead, for two reasons:
- First, you can still start to collect on turn 3 onwards (with 2x praerie only at turn 4 or later!)
- Second, you don’t give your opponent a land to step onto in front of your orb, from where he could place a deep desert (or other colored land or even 2x praerie!) next to my orb.
This is also the natural start, when playing a true* multi colored deck (*meaning: With not just a splash of 1 or 2 cards of a different color into an otherwise mono colored deck, e.g. a Triton Banquet into a mono green deck). Why? Because you usually need multiple colored lands asap, and probably also aim to reach the threshold for the bi-colored cards (3/3 land requirements) or even Three Wishes (2/2/2/2). You can still take the active defense approach, if you play Elementals, though.


 . There may be other ideas that are far better but this is all I could come up with right now.
