This topic has been automatically created through Faeria’s The Hub.
This content can be found here.
Hold on to your cards unless they have immediate impact on the board.
Playing cards too quickly is a common mistake in Faeria. This is possibly because it goes against a players instinct if they come from a game like Magic the Gathering or Hearthstone, where you get punished for not spending all your mana (their equivalent to faeria) each turn. The reason why you should hold on to your cards, unless they have an immediate impact, is because you want to withhold as much information about your hand and deck from your opponent as possible. Saving up faeria could also threaten the other player to perhaps play more defensively and play fewer threats, or overcommit.
But what do I mean when I say that a card should have “direct impact”?
Removal: Before you spend a card and faeria to remove one of your opponent’s creatures, make sure it has an impact on the following turn. If her creature will not be in reach to step on your land (and build lands because of it), gather faeria, damage you or your creatures, there is no reason to remove it this turn. Hold on to your cards and faeria untill it actually matters instead. At that point you might have found a better way to spend your faeria and better targets for your removal. There are of course exceptions to this “rule”, if you are worried that your opponent can play a combat-trick to reach your orb or creatures, take that into consideration before you decide not to play your cards. If a creature grows over time (like Seedling and Aurora’s Disciple) it is sometimes a good idea to remove it sooner.

In the example above, our opponent’s creature has no impact on the board. It can not collect Faeria, attack us or step on our land. Because of those reasons it is a good idea to save our removal-card for another turn.
Other events: Before you play an event, ask yourself if it will have a direct impact on the board. Playing “Day of the Dragons” is such an awesome feeling, but doing it at 12 faeria does not affect the board. All it does is give your opponent the information that you have access to four reduced cost dragons and she can start playing around that. If you want to play “Day of the Dragons”, do it when it makes sense. For example when you can play it and immediately play one of the dragons. That way you don’t give your opponent the time to react, you don’t spend 12 faeria in one turn and the next turn you will regret it because you draw something else that you would rather have played. The very same applies to many events, such as “Windfall” or “Auroras Creation”. Don’t play it unless you intend to play the copied card right away (or need a copy of it before you remove it or before they can remove it).
One of the most missplayed cards in the game is “Explore”. The second player starts with explore in her hand and whenever she plays it she gets a neutral land and two faeria.
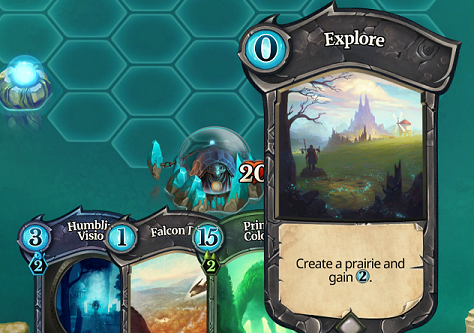
It is almost never (few exceptions) a good idea to play explore if it does not have a direct impact on the board.

In the picture above explore was used on player2’s first turn, followed by a lake to the side. We can see in the hand that the explore did not help the player play anything this turn. By playing explore followed by a lake to the side, the opponent gets valuable information. The opponent now knows in which direction to build her land to maximize her hands/decks potential while player2 has already commited towards the left.
Structures: There are also structures you should keep in your hand until they have an immediate impact. I often times see players play “Blood Obelisk” even though I don’t have any creatures on the board. Most of the times this is a mistake. Its better to keep the tower in your hand and only play it when an opponents creature is about to die. That way you keep information from your opponent and give her less time to react to your plays. Examples on other structures you should keep in hand until they have an immediate impact are “Golden Aviary” and “Kobold Barracks”.
The card-draw trap
The value of card-draw is heavily influenced by the deck you are playing. A lot of players who come from Magic The Gathering or Hearthstone tend to overvalue card-draw in Faeria. Faeria’s economysystem makes card-draw less important than in games like MTG and Hearthstone. There are multiple reasons for this:
(1) In MTG and Hearthstone it is important to use all your mana to not lose mana on your turn. Card-draw makes this easier.
(2) The longer the game goes the more mana you will have at your disposal each turn. With more mana it is more important to have the option to play multiple cards per turn.
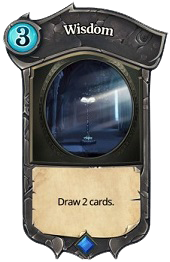
The card “Wisdom” often looks great to new Faeria players, but because the powerwheel allows you to draw an additional card each turn, in addition to the reasons mentioned above, it is in reality a weak card.
Note: Card-draw is not bad! The value of card-draw is heavily influenced by the deck you are playing.
Haste creatures.
Haste creatures have a lot of great uses. You can use them to quickly get on top of your opponents land to build lands towards them. You can use them as a source of removal to remove threats (and sometimes your creature even survives it!), and you can use them to quickly deal damage to your opponent’s orb. In all of these situations it’s important to know that haste creatures gather faeria the same turn they are played. So if it is possible to place the creature in a way that allows it to gather faeria before it attacks or establish board control, you should do that.
Removal numbers. (version 0.9.6186.34667)
There are some numbers that are important to be aware of when it comes to different types of removal. Here is a list of the available removals:
Neutral:
Can spend 1 faeria to deal 1 damage (Falcon Dive).
Can spend 2 faeria to deal 1 damage to all creatures (Famine).
Can spend 3 faeria to deal 2 damage to a creature, or 5 damage if its neutral creature (Punishment).
Can spend 4 faeria to deal 2 damage to all creatures (Plague Bearer into Falcon Dive).
Can spend 5 faeria to deal 3 damage to all creatures (Plague Bearer into Famine).
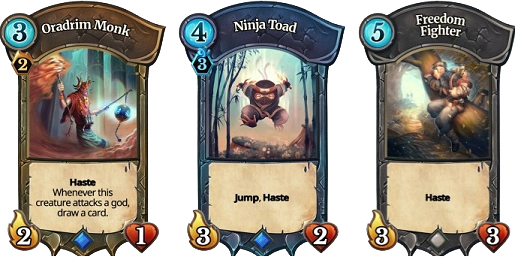
Can spend 5 faeria to summon a 3/3 haste creature (Freedom Fighter).
Can spend 9 faeria to summon three 2/2 haste creatures (Yak Attack).
Can spend 18 faeria to deal 3 damage to all enemy creatures, requires two mountains (Day of the dragons into red dragon).
Green:

Not available.
Blue:

Can spend 3 faeria to reduce a creatures base attack and life by half (rounded up), requires two lakes (Humbling vision).
Can spend 4 faeria to summon a 3/2 haste creature, requires three lakes (Ninja Toad. note, best card, awesome art!).
Can spend 4 faeria to gain control of a creature with attack 2 or less, requires five lakes (Aurora’s Trick).
Can spend 5 faeria to transform a creature into a 2/2 with jump, requires two lakes (Frogify).
Can spend 7 faeria to transform a creature into a 5/5, requires two lakes (Mirror Phantasm).
Red:

Can spend 2 faeria to deal 2 damage to a creature, requires two mountains (Seifer’s Wrath).
Can spend 3 faeria to summon a creature that deals 1 damage to an enemy, requires one mountain (Flame Spitter).
Can spend 3 faeria to deal 3 damage, requires two mountains (Flame Burst).
Can spend 4 faeria to deal 4 damage to a creature or structure, requires two mountains (Firebomb).
Can spend 5 faeria to summon a creature that deals 4 damage to an adjacent enemy creature, requires three mountains (Bomb Slinger).
Can spend 5 faeria to summon a creature that deals 2 damage to all adjacent enemy creatures, requires two mountains (Blazing Salamander).
Can spend 6 faeria to summon a creature that deals 1 damage to all enemies, requires two mountains (Groundshaker).
Can spend 6 faeria to deal 3 damage to all enemy creatures, requires three mountains (Firestorm).
Can spend 7 faeria to summon a 2/5 haste creature with flying and charge 2, requires three mountains and three deserts (Scourgeflame Specter).
Can spend 8 faeria to deal 9 damage randomly split among enemies, requires two mountains (Hellfire).
Can spend 8 faeria to summon a creature that deal 4 damage randomly split among enemies when using the +1Faeria ability on the power wheel, requires three mountains (Ignus, the First Flame).
Can spend 10 faeria to deal 3 damage to all enemy creatures, requires two mountains (Garudan, Heart of the Mountain).
Can spend 12 faeria to choose a space, destroy all creatures, structures and lands on or adjacent to that space. Requires five mountains (Meteor).
Yellow:

Can spend 1 faeria to summon a 0/1 haste creature (combined with buffs it could be used as removal), requires two deserts (Khalim’s Follower).
Can spend 2 faeria to drain 2 life from a creature, requires two deserts (Soul Drain).
Can spend 3 faeria to summon a 2/1 haste creature, requires two deserts (Oradrim Monk).
Can spend 3 faeria to summon a 3/1 haste creature with charge 3, requires two deserts (Wind Soldier).
Can spend 4 faeria to destroy a creature with 3 attack or less, requires two deserts (Choking Sand).
Can spend 4 faeria to destroy all creatures and structures, requires two deserts (Doomsday).
Can spend 6 faeria to destroy a target creature, requires three deserts (Last Nightmare).
Can spend 7 faeria to summon a 2/5 haste creature with flying and charge 2, requires three mountains and three deserts (Scourgeflame Specter).