How to improve at Faeria.
Hello, I am J0k3se and I am a big fan of Faeria! A lot of people have been asking me for advice the last few weeks so I decided to write this little guide, I hope you all enjoy.
HOW TO IMPROVE AT FAERIA
Hold on to your cards unless they have immediate impact on the board.
Playing cards too quickly is a common mistake in Faeria. This is possibly because it goes against a players instinct if they come from a game like Magic the Gathering or Hearthstone, where you get punished for not spending all your mana (their equivalent to faeria) each turn. The reason why you should hold on to your cards, unless they have an immediate impact, is because you want to withhold as much information about your hand and deck from your opponent as possible. Saving up faeria could also threaten the other player to perhaps play more defensively and play fewer threats, or overcommit.
But what do I mean when I say that a card should have “direct impact”?
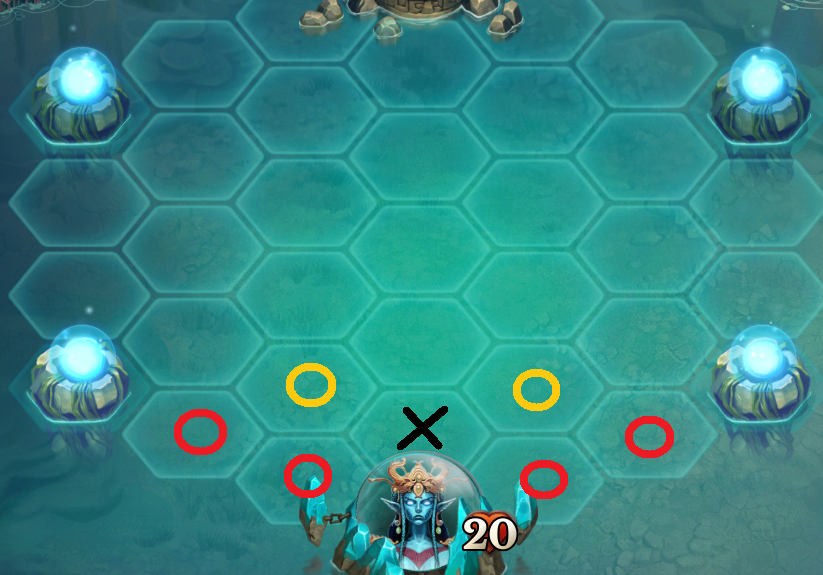
Removal: Before you spend a card and faeria to remove one of your opponent’s creatures, make sure it has an impact on the following turn. If her creature will not be in reach to step on your land (and build lands because of it), gather faeria, damage you or your creatures, there is no reason to remove it this turn. Hold on to your cards and faeria untill it actually matters instead. At that point you might have found a better way to spend your faeria and better targets for your removal. There are of course exceptions to this “rule”, if you are worried that your opponent can play a combat-trick to reach your orb or creatures, take that into consideration before you decide not to play your cards. If a creature grows over time (like Seedling and Aurora’s Disciple) it is sometimes a good idea to remove it sooner.
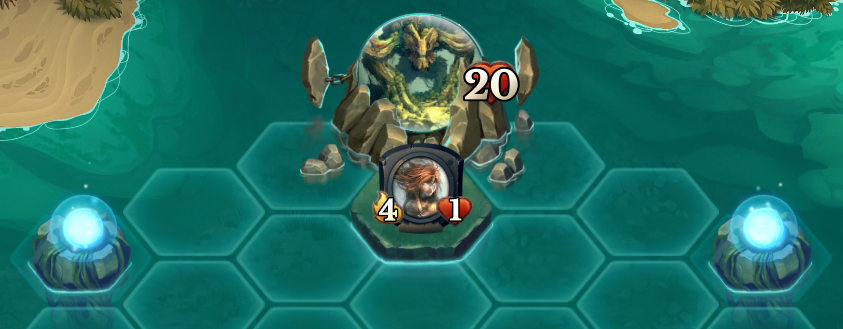
In the example above, our opponent’s creature has no impact on the board. It can not collect Faeria, attack us or step on our land. Because of those reasons it is a good idea to save our removal-card for another turn.
Other events: Before you play an event, ask yourself if it will have a direct impact on the board. Playing “Day of the Dragons” is such an awesome feeling, but doing it at 12 faeria does not affect the board. All it does is give your opponent the information that you have access to four reduced cost dragons and she can start playing around that. If you want to play “Day of the Dragons”, do it when it makes sense. For example when you can play it and immediately play one of the dragons. That way you don’t give your opponent the time to react, you don’t spend 12 faeria in one turn and the next turn you will regret it because you draw something else that you would rather have played. The very same applies to many events, such as “Windfall” or “Auroras Creation”. Don’t play it unless you intend to play the copied card right away (or need a copy of it before you remove it or before they can remove it).
One of the most missplayed cards in the game is “Explore”. The second player starts with explore in her hand and whenever she plays it she gets a neutral land and two faeria.
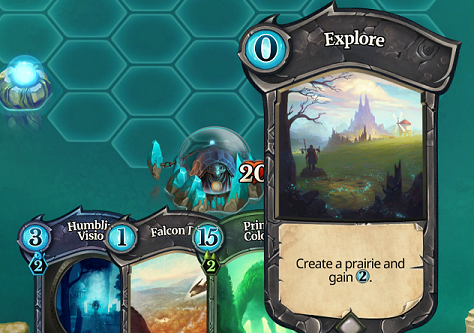
It is almost never (few exceptions) a good idea to play explore if it does not have a direct impact on the board.
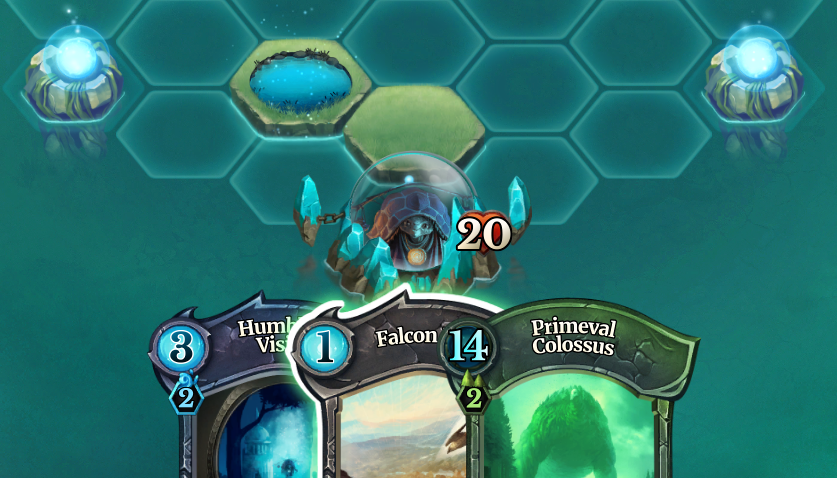
In the picture above explore was used on player2’s first turn, followed by a lake to the side. We can see in the hand that the explore did not help the player play anything this turn. By playing explore followed by a lake to the side, the opponent gets valuable information. The opponent now knows in which direction to build her land to maximize her hands/decks potential while player2 has already commited towards the left.
Structures: There are also structures you should keep in your hand until they have an immediate impact. I often times see players play “Blood Obelisk” even though I don’t have any creatures on the board. Most of the times this is a mistake. Its better to keep the tower in your hand and only play it when an opponents creature is about to die. That way you keep information from your opponent and give her less time to react to your plays. Examples on other structures you should keep in hand until they have an immediate impact are “Golden Aviary” and “Kobold Barracks”.
The card-draw trap
The value of card-draw is heavily influenced by the deck you are playing. A lot of players who come from Magic The Gathering or Hearthstone tend to overvalue card-draw in Faeria. Faeria’s economysystem makes card-draw less important than in games like MTG and Hearthstone. There are multiple reasons for this:
(1) In MTG and Hearthstone it is important to use all your mana to not lose mana on your turn. Card-draw makes this easier.
(2) The longer the game goes the more mana you will have at your disposal each turn. With more mana it is more important to have the option to play multiple cards per turn.
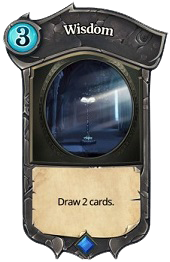
The card “Wisdom” often looks great to new Faeria players, but because the powerwheel allows you to draw an additional card each turn, in addition to the reasons mentioned above, it is in reality a weak card.
Note: Card-draw is not bad! The value of card-draw is heavily influenced by the deck you are playing.
Haste creatures.
Haste creatures have a lot of great uses. You can use them to quickly get on top of your opponents land to build lands towards them. You can use them as a source of removal to remove threats (and sometimes your creature even survives it!), and you can use them to quickly deal damage to your opponent’s orb. In all of these situations it’s important to know that haste creatures gather faeria the same turn they are played. So if it is possible to place the creature in a way that allows it to gather faeria before it attacks or establish board control, you should do that.
Removal numbers. (version 1.0)
There are some numbers that are important to be aware of when it comes to different types of removal. Here is a list of the available removals:
Neutral:
Can spend 1 faeria to deal 1 damage (Falcon Dive).
Can spend 2 faeria to deal 1 damage to all creatures (Famine).
Can spend 2 faeria to give a creature -2/-1 or Deal 3 damage to a structure (The Emperor’s Command).
Can spend 3 faeria to deal 2 damage to a creature, or 5 damage if its neutral creature (Punishment).
Can spend 4 faeria to deal 2 damage to all creatures (Plague Bearer into Falcon Dive).
Can spend 5 faeria to deal 3 damage to all creatures (Plague Bearer into Famine).
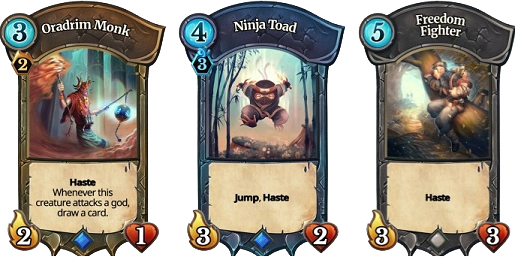
Can spend 5 faeria to summon a 3/3 haste creature (Freedom Fighter).
Can spend 9 faeria to summon three 2/2 haste creatures (Yak Attack).
Can spend 18 faeria to deal 3 damage to all enemy creatures, requires two mountains (Day of the dragons into red dragon).
Green:
Can spend 3 faeria to summon a 2/4 creature with gift: fight an enemy creature, requires two forests (Deepwood Stalker).
Can spend 4 faeria to restore a creature to its original Attack and Life. Usefull for removing buffs, requires two forests (Voice of Truth).
Can spend 6 faeria to summon a 3/3 creature with gift: Deal 4 damage randomly split among enemies. Give +4/+4 randomly split among allies., requires three forests and three mountains (Crackthorn Beast).
Blue:

Can spend 3 faeria to reduce a creatures base attack and life by half (rounded up), requires two lakes (Humbling vision).
Can spend 4 faeria to summon a 3/2 haste creature, requires three lakes (Ninja Toad. note, best card, awesome art!).
Can spend 4 faeria to gain control of a creature with attack 2 or less, requires five lakes (Aurora’s Trick).
Can spend 4 faeria to transform a creature into a 2/2 with jump, requires three lakes (Frogify).
Can spend 7 faeria to transform a creature into a 5/5, requires two lakes (Mirror Phantasm).
Red:

Can spend 2 faeria to deal 2 damage to a creature, requires two mountains (Seifer’s Wrath).
Can spend 3 faeria to deal 1 damage, requires two mountains (Derelict Tower).
Can spend 3 faeria to summon a creature that deals 1 damage, requires one mountain (Flame Spitter).
Can spend 3 faeria to deal 3 damage, requires two mountains (Flame Burst).
Can spend 4 faeria to deal 4 damage to a creature or structure, requires two mountains (Firebomb).
Can spend 5 faeria to summon a creature that deals 4 damage to an adjacent enemy creature, requires three mountains (Bomb Slinger).
Can spend 5 faeria to summon a creature that deals 2 damage to all adjacent enemy creatures, requires two mountains (Blazing Salamander).
Can spend 6 faeria to summon a creature that deals 1 damage to all enemies, requires two mountains (Groundshaker).
Can spend 6 faeria to deal 3 damage to all enemy creatures, requires three mountains (Firestorm).
Can spend 6 faeria to summon a 3/3 creature with gift: Deal 4 damage randomly split among enemies. Give +4/+4 randomly split among allies., requires three forests and three mountains (Crackthorn Beast).
Can spend 7 faeria to summon a 2/5 haste creature with flying and charge 2, requires three mountains and three deserts (Scourgeflame Specter).
Can spend 7 faeria to deal 9 damage randomly split among enemies, requires two mountains (Hellfire).
Can spend 8 faeria to summon a creature that deal 4 damage randomly split among enemies when using the +1Faeria ability on the power wheel, requires three mountains (Ignus, the First Flame).
Can spend 10 faeria to deal 3 damage to all enemy creatures, requires two mountains (Garudan, Heart of the Mountain).
Can spend 12 faeria to choose a space, destroy all creatures, structures and lands on or adjacent to that space. Requires five mountains (Meteor).
Yellow:
Can spend 1 faeria to summon a 0/1 haste creature (combined with buffs it could be used as removal), requires two deserts (Khalim’s Follower).
Can spend 2 faeria to drain 2 life from a creature, requires two deserts (Soul Drain).
Can spend 3 faeria to summon a 2/1 haste creature, requires two deserts (Oradrim Monk).
Can spend 3 faeria to summon a 3/1 haste creature with charge 3, requires two deserts (Wind Soldier).
Can spend 4 faeria to destroy a creature with 3 attack or less, requires two deserts (Choking Sand).
Can spend 4 faeria to destroy all creatures and structures, requires two deserts (Doomsday).
Can spend 6 faeria to destroy a target creature, requires three deserts (Last Nightmare).
Can spend 7 faeria to summon a 2/5 haste creature with flying and charge 2, requires three mountains and three deserts (Scourgeflame Specter).
Land placement.
This is a very big topic and I will update on this later. Make sure to create some lands close to your opponent so you can race your opponent to the win if you get the opportunity. Greed is nice, but there are many situations where pressure is better (also depends on the deck you run).
luuu90 made a great video about land-openings, check it out at below:
")
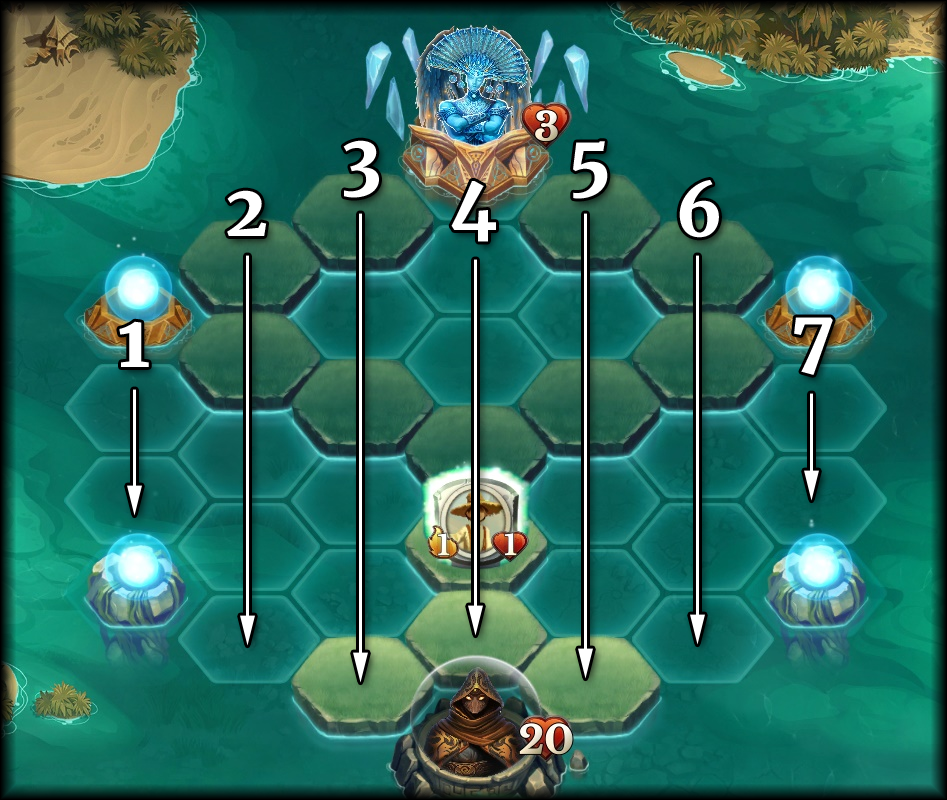
The importance of land placement when it comes to defending against rush:
On the picture above you can see red circles, yellow circles, and a black X.
The following buildorder is recommended if you play a slow deck.
- The red circles are your highest priority,
- The yellow circles are your second priority.
- The X is something you want to avoid building on.
If you manage to get the red lands your opponent will not be able to summon a creature at the faeria well and then move in to attack with them. If you are player one you should always be able to acquire these land unless your opponent is playing land-acceleration cards like earthcraft or elementals. If you manage to take control of these lands, you will be able to collect faeria in the beginning of your turn, and then move your creatures to defend. This way you will gain a lot of faeria over your opponent, which will allow you to put enough creatures on the board to defend properly.
The yellow circles are your second highest priority (in some match-ups and situations it is possible to take the yellow circles first and then the red ones). The reasons why the yellow lands are important is because they offer two routes to attack your orb which makes it harder for you to block your orb with your creatures.
The reason you don’t want to build a land in front of your orb marked with a black X, is you want your opponent to invest the resources in creating that land. If you create that land your opponent will be able to just summon creatures right above it and then step onto that land and attack your orb. Once your economy and defence have stabilised, start thinking about a counter-attack.
@Taiyodori has written a VERY detailed guide about how to defend against Yellow Rush with strategic land-placement (among other things), see his guide here
When you play your lands you want to make sure you get the best lands possible for the deck you are running. Sometimes it doesn’t make a big difference, but some decks rely on certain tiles to work properly. Below is a video that shows me playing “Red Rush”, where the deck is actually built around land costs/placements (among other things).

Plan your turn.
Before you play anything or move anything on your turn, think about what you want to do. Don’t stress. That way you can hopefully prevent some misplays. After you have thought about your turn, if your plan is to draw an extra card, do it FIRST. Then, again, think about what you want to do this turn, your new card might allow even better plays.
Know your deck.
It is important that you know your deck, keep track on what’s left for you to draw. Can you draw into lethal? Can you draw into a taunt that saves you? Do you have an event in the deck that can give you the upper hand? In longer games it can be very helpful to know what cards you will draw the next few turns. It allows you to make plays accordingly. If you know what cards are left in your deck, you can fish for cards to try and find exactly what you need. Knowing what cards you can draw should influence how aggressively you’re playing. If you know that you don’t have any real threats left in your deck, or very few, it might be a good idea to play aggressively and try to end the match sooner rather than later.
Opening hand and flexibility.
Before the game begins you should know which cards you are hoping to see in your opening hand. What you are hoping to draw obviously depends a lot on the type of deck you are playing. A common mistake players running “lategame-decks” do is that they are not flexible enough to turn on the aggression. For example, if a mono-green player runs really powerful (lategame) cards like Thyrian Golems, Verduran Forces, Taruum, Tethra, Ruunin the Relentless etc, they tend to play very defensively in order to have enough time to establish their mighty board presence. But if you happen to have 3x Verduran Force in your starting hand (or something similar) it is often a very strong play to build towards your opponent right away. On turn three (assuming you are player one and spent one turn playing double prairies) you can then drop a Verduran Force close to your opponents orb, the following turn you drop another one, and potentially a third one two turns after that. That is incredibly difficult for most decks to deal with. Even if you think your deck is stronger in the late game, you should take advantage of powerful opening hands to push your advantage.
If you plan to mulligan (draw a new opening hand), try to not do it before your opponent! Keep an eye on your opponents hand, weather or not she mulligans is important information. If she does mulligan there is a chance that she has a bad hand and you can punish it by being aggressive. That is why you should never mulligan before your opponent (you either do it after them or in the last second).
Play to win. Don’t “play to not lose”.
In Faeria it is important to realize when you have a window in which you can win. A lot of games drag out very long because the defending player is spending all her resources in doing so, even though it is often (not always) more important to try to apply pressure on your opponents orb with a counter-attack. It is also important to know when to trade creatures and when to attack the orb. If you are the aggressor, let your opponent do the trades, unless of course there is a way she can do very favourable trades, or if you suspect she has combat tricks available.
In Faeria it is important to realize when you have a window in which you can win. A lot of games drag out very long because the defending player is spending all her resources in doing so, even though it is often (not always) more important to try to apply pressure on your opponents orb with a counter-attack. It is also important to know when to trade creatures and when to attack the orb. If you are the aggressor, let your opponent do the trades, unless of course there is a way she can do very favourable trades, or if you suspect she has combat tricks available.
The Turn^4 theory.
Take a moment and watch this video created by @PseudoSphere. A theoretical overview followed by a practical one of the Turn^4 theory proposed and popularized by @Zaldinfox.

Terminology and Mechanics in detail (Guide by luuu90)

Game mechanics you should know about.
- At the end of the controllers turn, aquatic minions die if they end up on land, and non-aquatic/flying minions die if they end up in the ocean.
- Creatures with charge/flying cannot move through your minions or structures.
- Ranged creatures cannot shoot through your own minions.
- Ranged creatures will take strikeback damage only if they attack an adjacent enemy, not if the creature is more than one tile away - unless that creature also has ranged.
- Creating a forest at random can also alter your prairie tiles (wild growth, vine wall).
- An enemy well is the two wells closest to your opponent.
- “Move a creature” (Flash Wind/Oradrim Fanatic) means move it as if that creature was moving. So jump, charge and flying applies. “Move a creature” can also be used to move away from Taunt.
- Deathtouch only kills an enemy creature if damage is dealt (If a creature with protection is attacked by a creature with deathtouch, it will not die. If a creature has deathtouch and four or more attack and attacks Sharra, Sharra will not die).
- You can only have 9 cards in your hand. If you were to draw a card when you already have 9, the card will be lost.
- When your deck is empty and you draw a card, you take fatigue damage. Fatigue deals 1 damage +1 damage for each time fatigue has already dealt damage to that player.
- If you transform (Frogify, Mirror Phantasm, Orosei) a creature that is able to attack, it will still be able to attack after transforming it. Except if you play a creature with haste and transform it the same turn (it will lose haste and therefore the new creature will no longer be able to attack).
- If you replace a creature (Demon Wrangler, Oath to Oblivion), the new creature will not be able to attack the same turn it is played, even if the creature it replaces was able to attack.
- Taunt only affect adjacent creatures. If you have a creature with charge 3, you can move it past the taunt as long as you dont land adjacent to it.
- Abilities that allow you to move creatures (Dash, Flash wind, Oradrim Fanatic) ignores taunt.
- Game effects can no longer target creatures that are about to die.
Example:
If an Elderwood Hermit and a Farm Boy are being destroyed by a Firestorm, the Hermit will no longer buff the Farm Boy.
- When a creature dies, its effects remain until the ability or event that provoked its death has been completely resolved.
Examples:
Blood Singer will now always deal damage to the enemy when it destroys another creature and dies in the process.
A Meteor that kills 3 opponent creatures and an ally Blood Singer will always deal 3 damage to the opponent, even if the Blood Singer is destroyed first.
- The order in which things occur on the board […]
Examples:
Which creature harvests first when multiple are next to Faeria wells
Which creature is damaged first by Area of Effect damage from Slam, Firestorm, Groundshaker, etc.
These situations are based on the order of the locations where these creatures are on the board. Location order starts from the top-left corner down to the bottom-left corner, then continues on the column to the right, always from the top to the bottom from the point of view of the active player (so this is actually inverted for you if your opponent plays a spell such as Firestorm).
This means that a creature in column 1 will always harvest before a creature from column 2 from the same well. Additionally: A creature above another in the same column will always harvest first.
Source: Patch notes: November 30th, 2016
Card mechanics you should know about.
- Prophet of Tides can not move two different lands, but it can be cancelled after moving one land once by rightclicking.
- You and your opponent can see what card has been drawn by Royal Judge (while it is on the board) by hovering over it.
- Aurora, Myth Maker cannot target herself or enemy creatures. If you have 2x Aurora, Myth Maker’s, the second one can target the first.
- Tiki Caretaker and Tiki Piper can target themselves.
- Ruunin’s Avenger and Soul Eater can grow while is on the board.
- Azure Wisp does not have to be the creature collecting faeria to gain the +1+1 bonus.
- Bloodwell Sprite does not have to be the creature collecting faeria to deal one damage to your opponent.
- Frogs from Battle Toads can only be placed on lakes.
- Aurora’s Creation can target enemy minions.
- Seifer, Blood Tyrant absorbs the creature’s original stats plus buffs, not the stats when it’s damaged and loses a battle to Seifer.
- Oradim Saggitarius’s text, “whenever you attack a god, gain 1 Faeria” applies to attacks from any of creatures you control, not just Oradim Saggitarius.
- If Battle Rager is destroyed (Last Nightmare, Choking Sand or Meteor), no damage will be dealt to the other player.
- When Egg of Wonder transforms into a creature, the creature will not be able to act this turn and if the creature has a gift ability it will not trigger.
See @DarkShaders post for a list of all the cards in Faeria with an accurate text and some extra precision about what a card actually do or cannot do in-game.
Thats it.
I hope you enjoyed this guide and that it will help you improve your game. I would very much appreciate if you took the time to follow me on Twitch and youtube, I absolutely love to play this game and its even more fun if I have some people to chat with while I play ![]()
If you want further help, contact me via http://www.Faeriacoaching.com ![]()


 I agree with Foxclear that it would be an abuse and also that it should be reworded to be more clear!